
4 posts tagged with "prototyping"

View All Tags

· 5 min read

In today's scenario, we are seeing a shift from the monolithic landscape to microservice landscape. In simple words it can be termed as breaking a complex problem into smaller parts and making it easier to manage and develop. In Go to make this easier there is a framework GO MICRO - a helpful framework for building microservice applications with the Go programming language.

Why Microservice Architecture

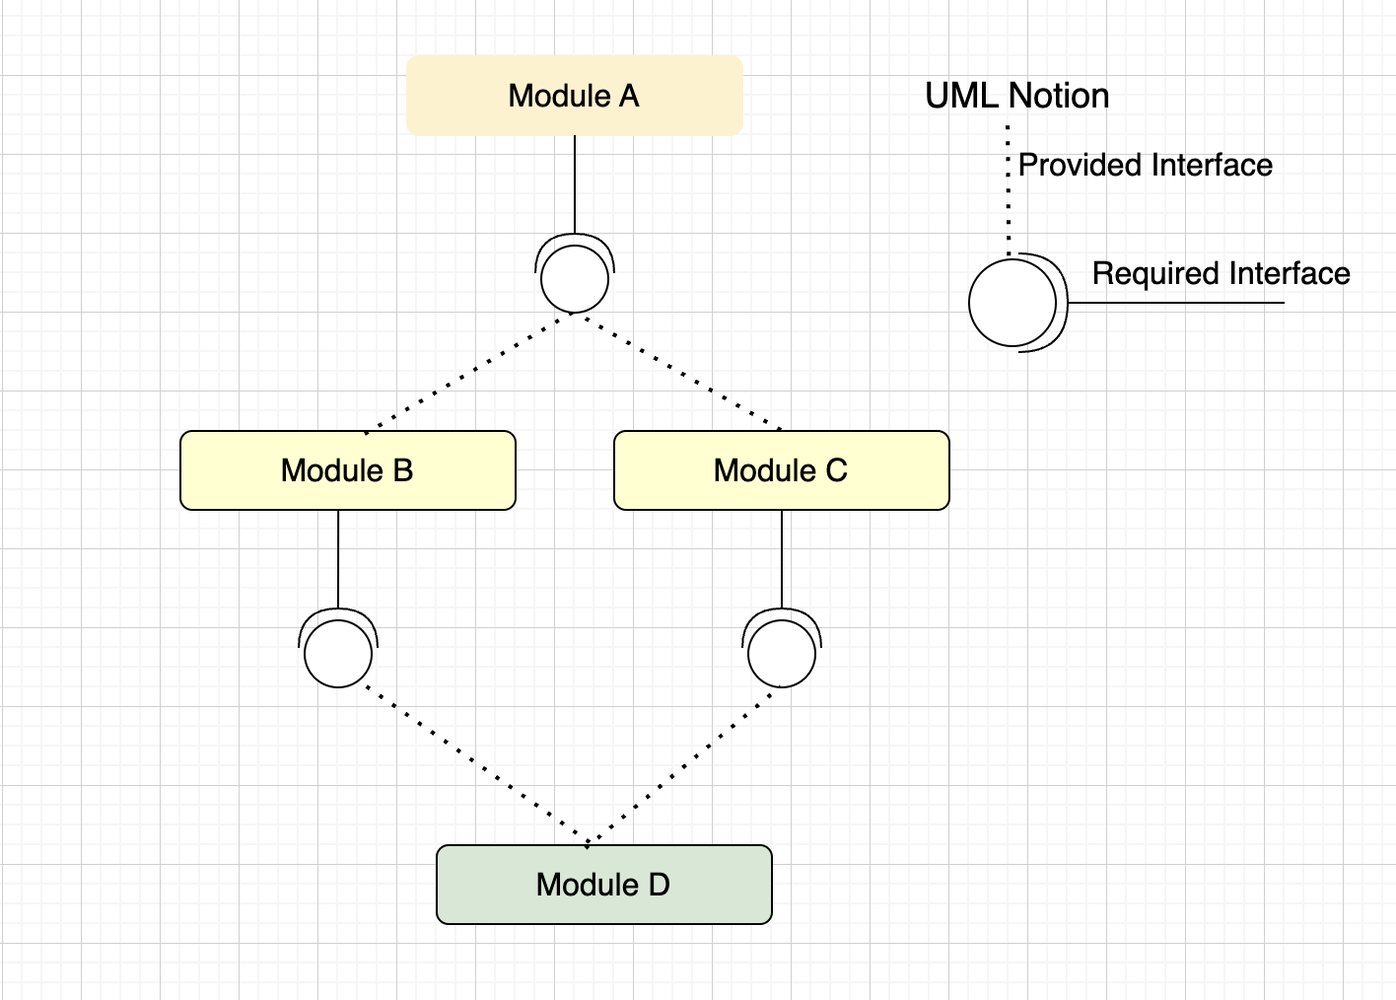
Imagine a library where all the books used to be stacked in one massive room. It would be chaotic trying to find the book you needed among the towering shelves. But now, picture this library transformed into a series of smaller rooms, each dedicated to a specific genre—mystery, romance, science fiction, and so on. Each room is organized neatly, making it easier for readers to find the books they're looking for without getting lost in the sea of literature. This is similar to how microservices work in software—they break down complex applications into smaller, specialized components, making it simpler for developers to manage and maintain the software.

Now how do we build them??

Meet GOMICRO - A framework for distributed systems development

In the world of microservices, Go Micro is like your trusty sidekick. It helps developers build and manage microservices without all the headaches of doing it from scratch. Think of it as a toolbox full of handy tools to make building microservices easier and faster.

How Go Micro helps us??

  • Authentication and Authorization - Security is paramount in any architecture.Gomicro provide authorization.It seamlessly integrates with authentication providers like Keycloak, serving as a middleware to authenticate incoming requests.

  • Service Discovery - Effective communication among microservices necessitates a reliable service discovery mechanism. Go Micro simplifies this with built-in support for mdns (Multicast DNS) and offers integrable libraries (plugins) for popular options such as Eureka, Etcd, Consul, and NATS, among others.

  • Messaging - Messaging is an important aspect in the microservice architecture and event driven architectures. Go Micro eases the implementation of pub-sub models and other messaging paradigms with its plugin-based approach. Whether it's HTTP event message brokering or support for NATS, RabbitMQ, or Kafka, Go Micro has you covered.

  • Protocols - Go Micro supports communication via HTTP and RPC (Remote Procedure Call), providing abstractions for synchronous communication. This flexibility enables developers to choose the most suitable communication protocol for their specific use cases.

Tutorial

  1. Visit WeDAA: Go to WeDAA.

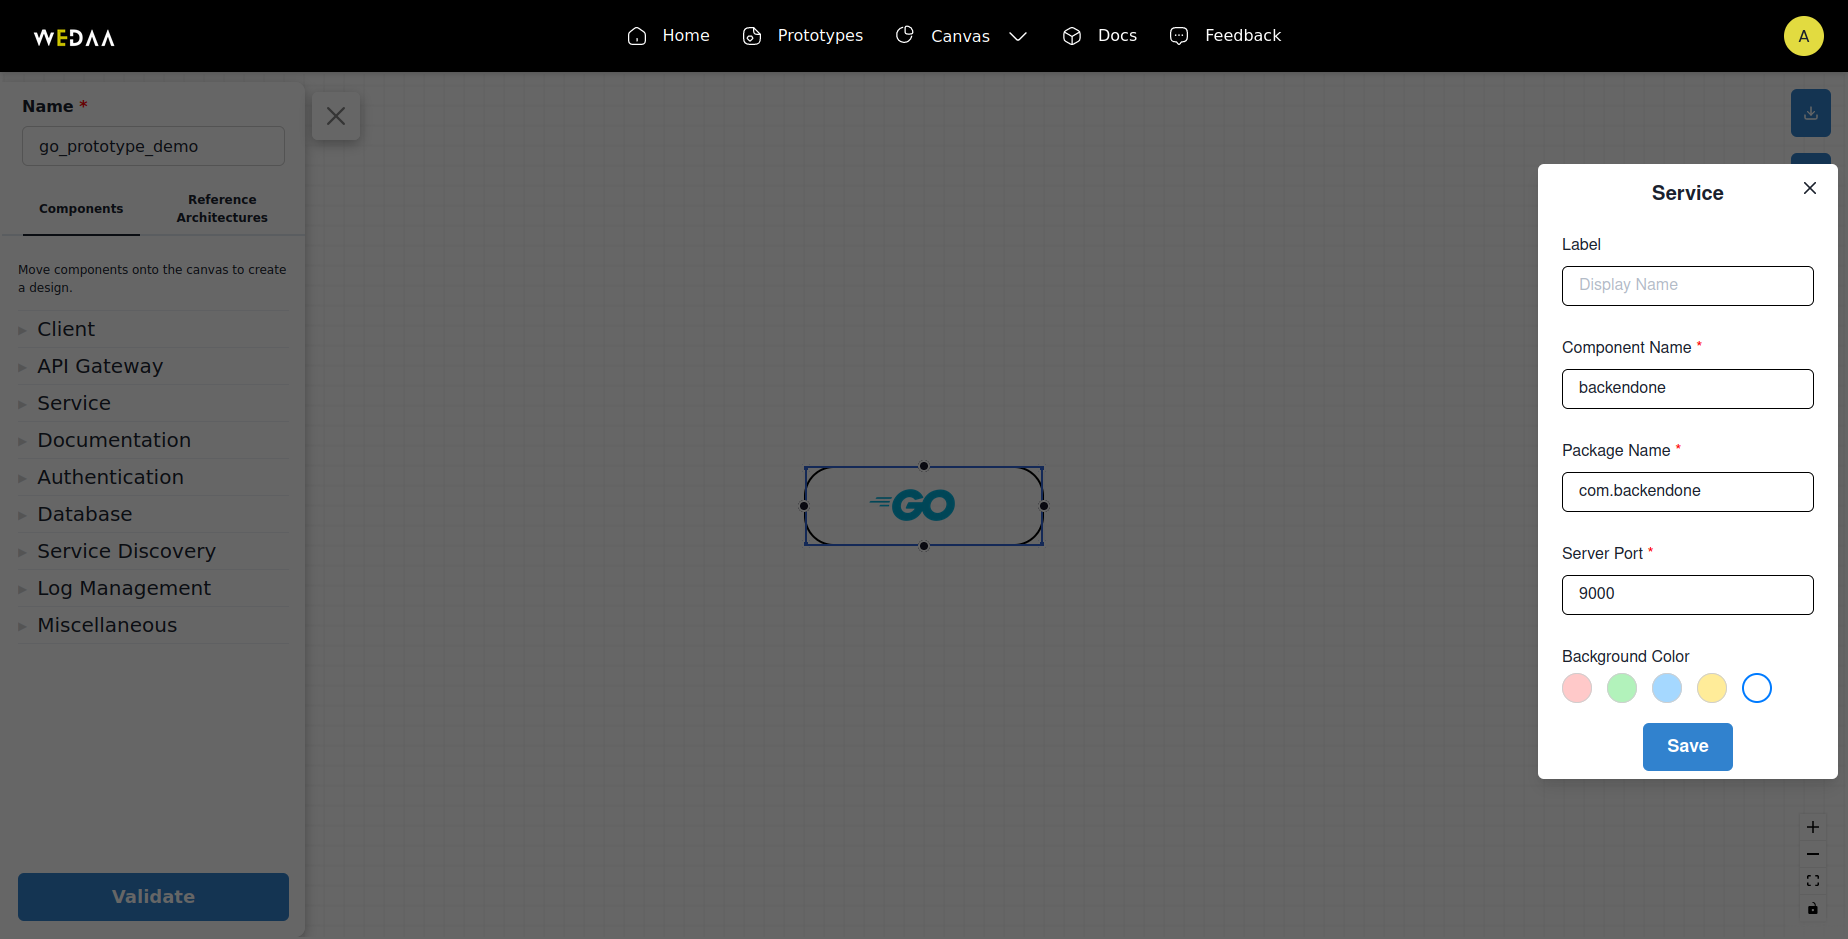
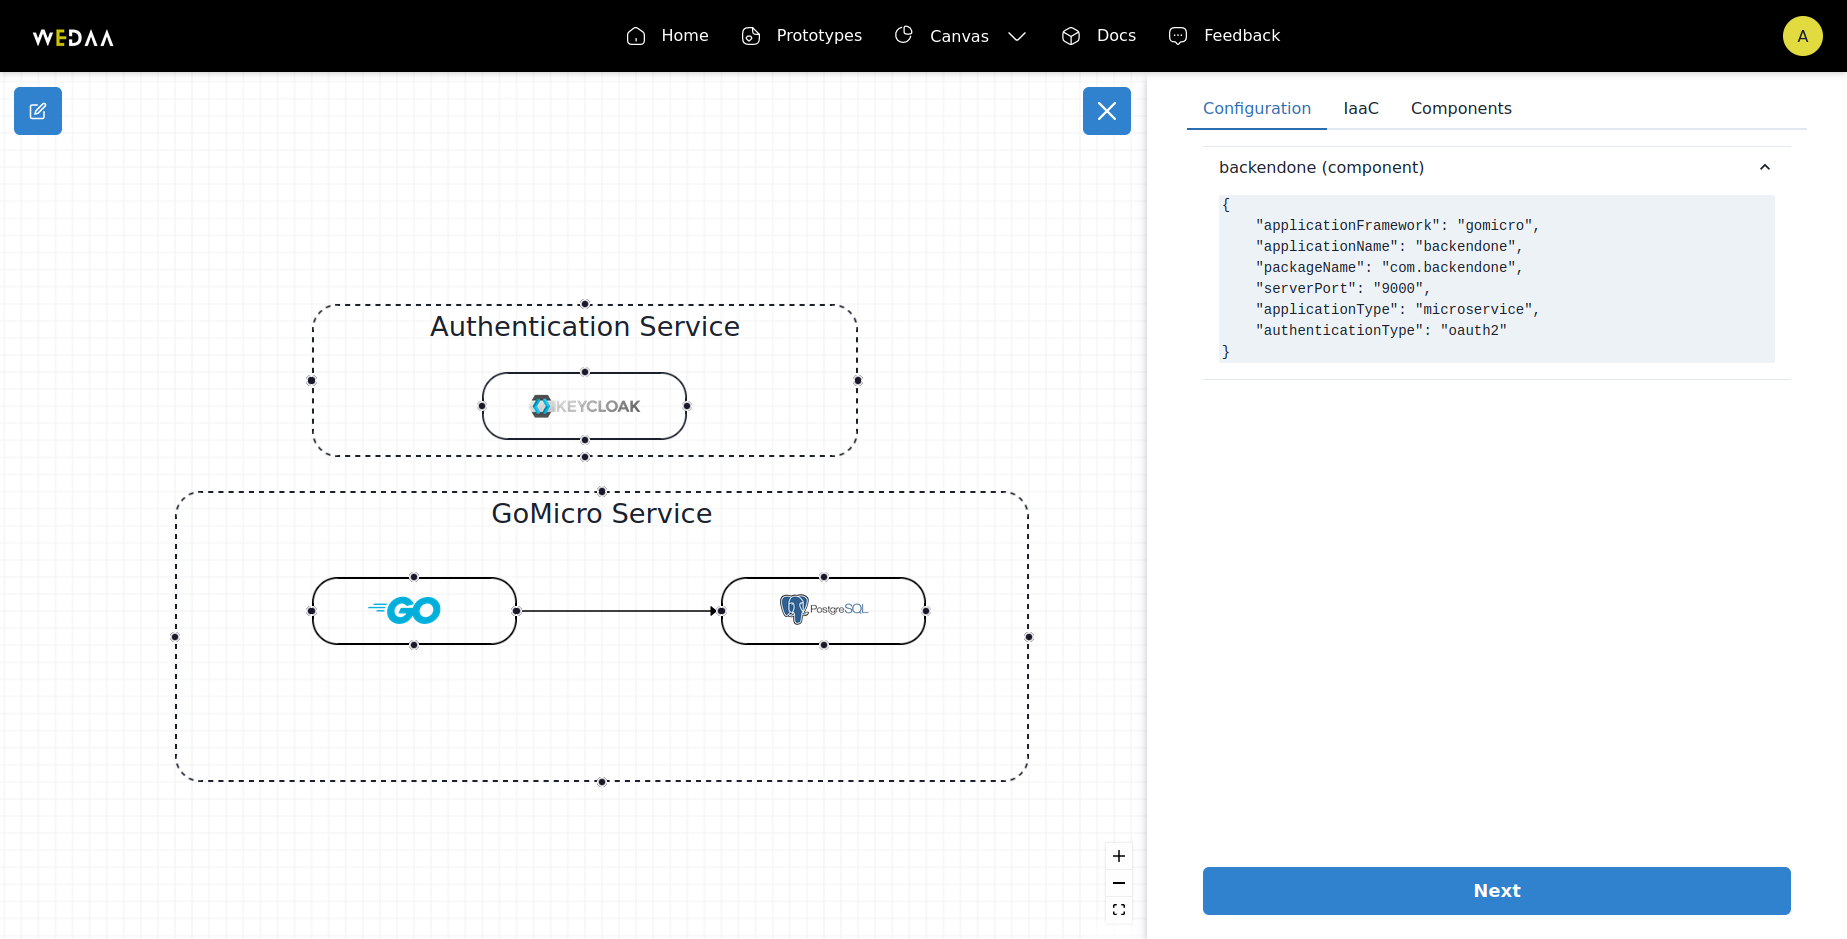
  2. Choose GoMicro Application: Navigate to the service tab in the sidebar and select Go. Drag and drop it onto the canvas.

  3. Connect a Database and Add Authentication: Connect a database to the application. Additionally, add authentication to secure the application. WeDAA supports Keycloak as an authentication IDP.

Sample GOMICRO WeDAA Architecture

  1. Fill in Required Details: Provide necessary details for the service and database connection.

Sample GOMICRO WeDAA Architecture

  1. Validate and Review: Click on validate to review the setup. Ensure everything is configured correctly.

Sample GOMICRO WeDAA Architecture

  1. Cloud Service Setup (Optional): Weeda has support for Azure, AWS and minikube.We can opt for one and fill in the necessary details to deploy applications in the specific cloud provider.we can skip this step for now by selecting none.

Sample GOMICRO WeDAA Architecture

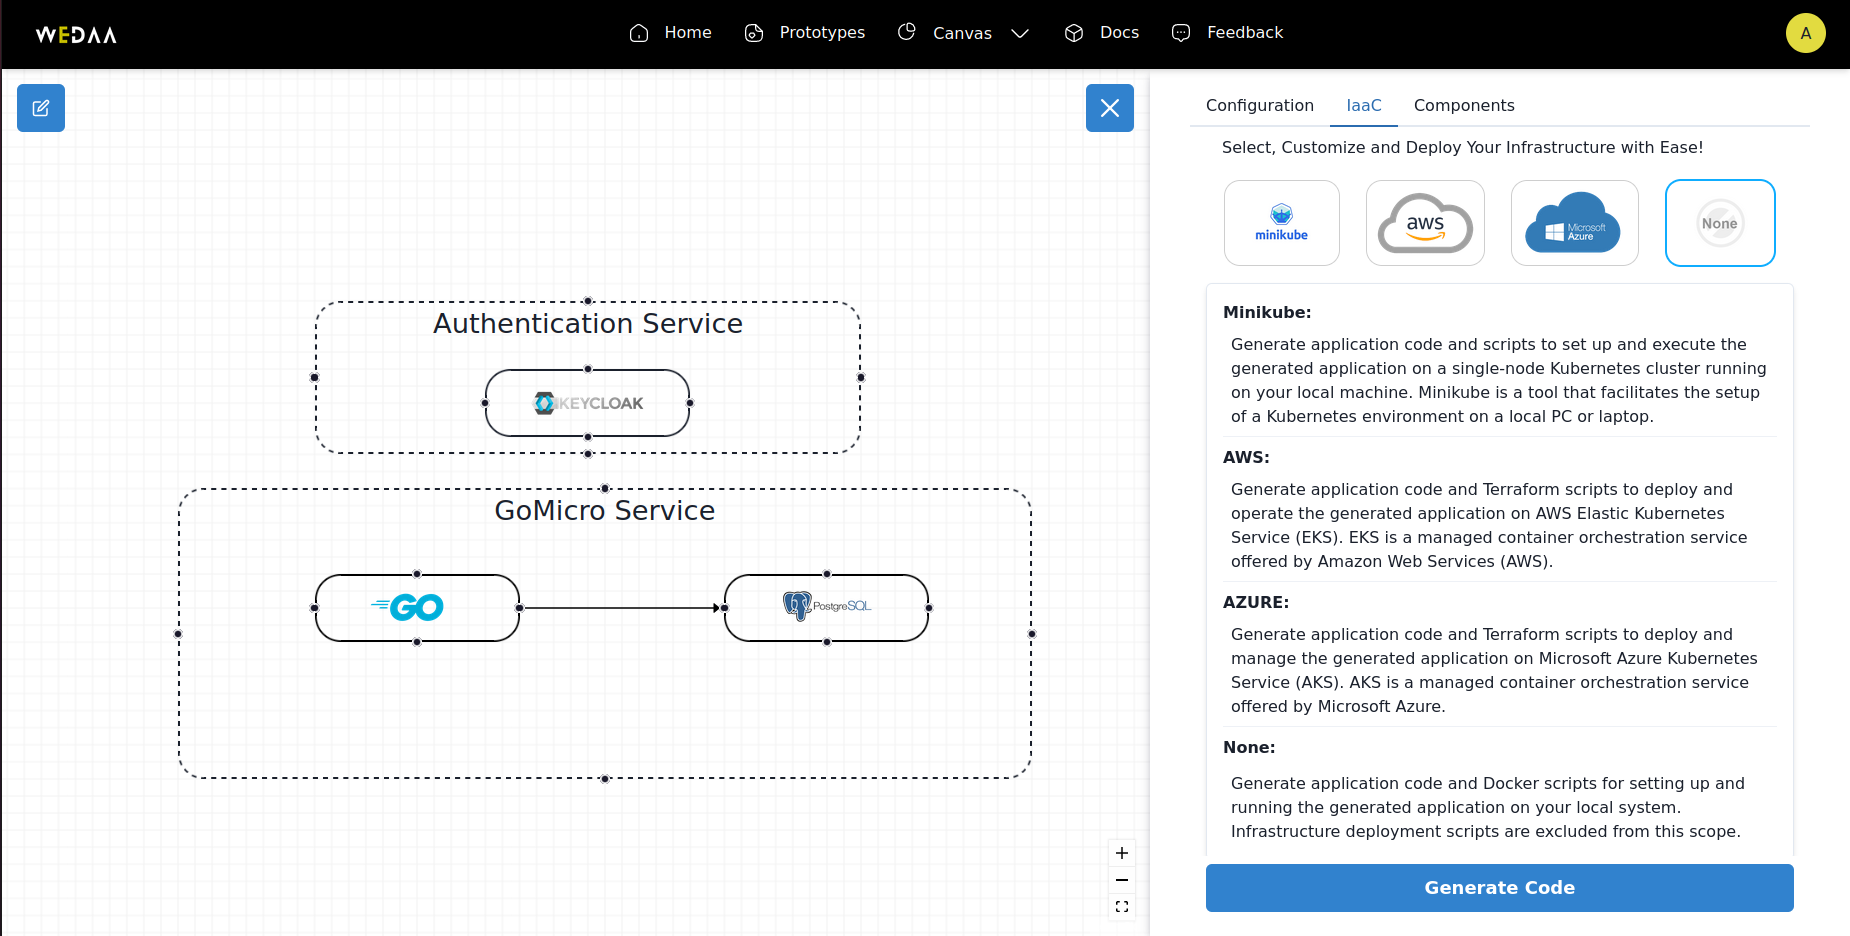
  1. Generate Project Zip: After submission, a zip file containing the project will be generated.

Application Quickstart Guide

  1. Prerequisites: Ensure Docker is set up in advance if Keycloak is not configured as standalone or if PostgreSQL is not set up separately. Keycloak and PostgreSQL provided are Dockerized containers.

  2. Start Keycloak and PostgreSQL:

   docker compose -f docker/keycloak.yml up -d
docker compose -f docker/postgresql.yml up -d
  1. Start the Go Service: Once Keycloak and PostgreSQL services are up, start the Go service.

  2. Install Dependencies and Run the Service:

   go mod tidy
go run .

This command will install any required dependencies and then run the Go service.

Understanding the code

package main

func main() {
app.Setconfig()
migrate.MigrateAndCreateDatabase()
auth.SetClient()
config.InitializeDb()
port :=app.GetVal("GO_MICRO_SERVICE_PORT")
srv := micro.NewService(
micro.Server(mhttp.NewServer()),
)
opts1 := []micro.Option{
micro.Name("backendone"),
micro.Version("latest"),
micro.Address(":"+port),
}
srv.Init(opts1...)
r := mux.NewRouter().StrictSlash(true)
r.Use(corsMiddleware)
registerRoutes(r)
var handlers http.Handler = r

if err := micro.RegisterHandler(srv.Server(), handlers); err != nil {
logger.Fatal(err)
}

if err := srv.Run(); err != nil {
logger.Fatal(err)
}
}
  • Config Initialization - The application begins by loading configuration values from externalized YAML files into the environment. This ensures that the application has access to the necessary configuration parameters.

  • Database Migration - WeDAA supports migration for PostgreSQL databases. Using the go-migrate package library, a new database is created and data initialization is performed. This ensures that the database is properly set up and populated with initial data.

  • Authentication Setup - The code proceeds by setting up the authentication client,here Keycloak is being used as the identity provider (IDP) for authentication. This involves establishing a connection to Keycloak.

  • Microservice Setup - The micro.NewService function is a notation used by GoMicro to set up the microservice. Here, configurations are provided to the microservice via options. This step initializes the microservice and prepares it to handle incoming requests.

  • Router Setup - The code utilizes the mux router to create a routing setup. This involves defining endpoints and their corresponding handlers. The router is then registered with GoMicro, indicating that the microservice should use this router to handle incoming requests.

  • Application Execution - Finally, the application is run. This step starts the microservice, allowing it to listen for incoming requests and handle them according to the defined routing setup.

Conclusion

Go Micro leverages Go interfaces for each distributed system abstraction, rendering them pluggable and runtime-agnostic. This inherent flexibility allows developers to seamlessly integrate various underlying technologies, optimizing microservice development in a clean and efficient manner.

· 2 min read

With the long history of software development, one debate persists: should we prioritize solid application architecture and adhere to best development practices before building a working prototype, or should we quickly create a functional prototype to validate the idea before investing considerable time and resources in identifying technology and architecture?

Given the rapid evolution of technologies and the increasing demands of business requirements, right approach is to emphasises speed while ensuring the quality and robustness of the application or architecture.

Rapid Application Prototyping (RAP) offers a valuable method to put ideas into action and comprehend both the technical and functional aspects of a solution. Rapid Application Prototyping (RAP) is an approach that prioritizes building and displaying the minimum viable functional view of an application as soon as possible.

Few essential aspects of platforms supporting Rapid Application Prototypes.

Modularity: A prototype should be developed using modern modular architecture patterns, enabling easy integration or modification of business features and technical solutions. Modularity facilitates the construction and maintenance of smaller, more manageable components.

Modularity

Loose Coupling: Modular components of the application should possess well-defined interfaces to encourage loose coupling among them. Loose coupling simplifies the integration of new features or technologies.

Loose Coupling

Scalability: A RAP platform should support the construction of a scalable architecture, enabling preliminary horizontal scaling of modular components. Scalability is crucial for creating resilient and high-performance systems.

Scalability

Resilience and Robustness: In the event of a component failure or issue, the entire system should not necessarily collapse. Failures should be contained within the affected module or service, minimizing their impact on other parts of the application. The modules or services within an application should demonstrate robustness, meaning they can gracefully handle failures, unexpected conditions, and varying loads while maintaining overall functionality and availability.

Resilience and Robustness

WeDAA engineering platform empower developers to build Rapid Application Prototypes (RAP) quickly with all the essential features required for building a well architected enterprise application.

· 6 min read

In the fast-paced world of web development, prioritizing the security of our applications is paramount. This blog post takes you on a journey to enhance the security of your React app by seamlessly integrating it with Keycloak, a robust authentication and authorization server. To simplify this process, we'll leverage the npm package react-oidc-context, bridging React and Keycloak while implementing OpenID Connect (OIDC). Whether you're a seasoned developer or just stepping into React and authentication, this post provides practical insights to bolster the security posture of your web application. Let's dive into the world of React, Keycloak, and react-oidc-context for a more secure development experience.

🚀 Quickstart:

  1. Visit app.wedaa.tech

  2. Click on the "Static Web page" component

    Choose Framework

  3. Select a frontend framework: React, then click next

    Choose React

  4. Choose Authentication and Authorization: Keycloak, then click Next

    Choose Keycloak

  5. Review your project composition and confirm by clicking "Go to Canvas"

    Review Composition

  6. Provide a valid name to your prototype and click on "Validate"

    Prototype Validation

  7. Review your prototype configuration, then click Next

    Prototype Configuration

  8. Finally, click "Generate Code" to download the secured React application

    Generate Code

WeDAA offers a pre-configured React application secured by Keycloak. Simply extract our application, follow the instructions in the README, and initiate your application to seamlessly experience it first-hand.

🧠 Understanding the Generated Code

  1. src/index.js
// Code for initializing React application with authentication and authorization capabilities.
import React from 'react';
import ReactDOM from 'react-dom/client';
import './index.css';
import App from './App';
import reportWebVitals from './reportWebVitals';
import { AuthProvider } from 'react-oidc-context';

const oidcConfig = {
authority: process.env.REACT_APP_OIDC_AUTHORITY,
client_id: process.env.REACT_APP_OIDC_CLIENT_ID,
redirect_uri: process.env.REACT_APP_PROJECT_URL,
// ...
};

const root = ReactDOM.createRoot(document.getElementById('root'));
root.render(
<AuthProvider {...oidcConfig}>
<App />
</AuthProvider>
);

// If you want to start measuring performance in your app, pass a function
// to log results (for example: reportWebVitals(console.log))
// or send to an analytics endpoint. Learn more: https://bit.ly/CRA-vitals
reportWebVitals();

  • This code initializes a React application with authentication and authorization capabilities using the react-oidc-context library.

  • The main application (App) is wrapped in an AuthProvider with configurations derived from the OIDC parameters specified in the oidcConfig object.

  • The oidcConfig object contains configuration parameters required for OpenID Connect authentication.

  • Environment variables (REACT_APP_OIDC_AUTHORITY, REACT_APP_OIDC_CLIENT_ID, and REACT_APP_PROJECT_URL) are used to dynamically set these values.

  1. dotenv (.env file)
// Environment variables for configuring the React application.
PORT=4200
GENERATE_SOURCEMAP=false

REACT_APP_PROJECT_NAME=webapp
REACT_APP_PROJECT_URL=http://localhost:4200


# WEDAA
REACT_APP_WEDAA_DOCS=https://wedaa-tech.github.io
REACT_APP_WEDAA_GITHUB=https://github.com/wedaa-tech

# OIDC Configuration
REACT_APP_OIDC_AUTHORITY=http://localhost:9080/realms/jhipster
REACT_APP_OIDC_CLIENT_ID=web_app

  1. src/config/auth/privateRoute.js
// Code for defining a PrivateRoute component for protecting routes based on authentication status.
import React from 'react';
import { useAuth } from 'react-oidc-context';

const PrivateRoute = ({ children }) => {
const auth = useAuth();

switch (auth.activeNavigator) {
case 'signinSilent':
return <div>Signing you in...</div>;
case 'signoutRedirect':
return <div>Signing you out...</div>;
}

if (auth.isLoading) {
// <div>Loading...</div>;
return <div></div>;
}

if (auth.error) {
return <div>Oops... {auth.error.message}</div>;
}
if (!auth.isAuthenticated) {
let originPath = window.location.pathname;
auth.signinRedirect({
redirect_uri: process.env.REACT_APP_PROJECT_URL.concat(originPath),
});
}

if (auth.isAuthenticated) {
window.history.replaceState({}, document.title, window.location.pathname);
return <>{children}</>;
}
};

export default PrivateRoute;

  • This code defines a React component called PrivateRoute that serves as a wrapper for protecting certain routes in your application based on authentication status.

  • The PrivateRoute component takes a children prop, which represents the content that should be rendered if the user is authenticated.

  • Switch statement checks the activeNavigator property in the authentication context. If the user is in the process of a silent sign-in or sign-out redirect, it displays a corresponding message.

  • If the authentication context is still loading, the component returns an empty div (essentially doing nothing until authentication data is available).

  • If the user is not authenticated, it initiates a redirection to the authentication server using the signinRedirect method. It also captures the current path to redirect the user back to the intended page after authentication.

  • If the user is authenticated, it updates the browser history to remove sensitive information and renders the original children content.

  1. docker/
|_docker
|_realm-config
|_jhipster-realm.json
|_keycloak.yml
  • The Docker directory houses a Docker Compose configuration for Keycloak. This configuration initiates a Keycloak container that serves as the authentication server for our React application.

  • Within the docker/realm-config directory, there is a JSON-formatted realm configuration. This information, presented in JSON format, is essential for our React application as it serves as the OIDC (OpenID Connect) configuration.

🚦 Getting Started

  1. Start the keycloak server
npm run docker:keycloak:up
  1. Install dependencies for the first time.
npm install
  1. Start you React application
npm start

📸 Example images in action

  1. Home page of the React application generated via WeDAA.

    Home page

  2. Login Page for the React application powered by keycloak (click on the sign in button to land on this page, by default two users are provided [user,admin]; password is same as username).

    Login Page

  3. Home page after sucessful Login.

    Logged In Home page

✨ Conclusion

Congratulations! 🎉 You've successfully navigated the realm of securing your React applications with the formidable duo of Keycloak and react-oidc-context. As you embark on your coding journey, armed with a fortified understanding of authentication and authorization, here's a recap of your key accomplishments:

  • Seamlessly integrated Keycloak as the authentication and authorization powerhouse.
  • Leveraged the elegance of react-oidc-context to bridge the realms of React and OpenID Connect.
  • Initiated a secure React application that not only prioritizes user experience but also champions data protection.

🚀 Quick Dive

Before you go, let's take one last glance at the live example you've created. Head over to app.wedaa.tech and witness your React application in action. From dynamic prototyping to authentication magic, your creation stands as a testament to your development prowess.

🛠️ Further Exploration

As you continue your coding adventures, explore the depths of the generated code. Whether it's delving into the intricacies of src/index.js, configuring environment variables in .env, or understanding the protective dance of src/config/auth/privateRoute.js, every line of code tells a story of security, creativity, and innovation.

🌐 Beyond the Horizon

For more insights and documentation, sail over to the WeDAA Documentation and explore the GitHub repository at github.com/wedaa-tech. Your journey doesn't end here – it's a launching pad for future projects, collaborations, and secure web development endeavors.

🚀 Ready, Set, Code!

Armed with the knowledge and hands-on experience gained in this blog post, you're now equipped to conquer the world of React security. Start your engines, dive into the code, and let your creativity unfold. Happy coding, and may your React applications always be secure and splendid! 🌟

· 2 min read

In our ever-evolving tech landscape, we continually encounter new tools and technologies for constructing common software structures. With technology's daily progress, we witness fresh parameters and approaches applied to our existing setups.

To draw a parallel, consider the preparation of a delectable Biryani. The first step is to gather the right ingredients before diving into cooking. Spices, curd, salt, rice, and, of course, gasoline are essential. Most of these ingredients remain constant for everyone, while the art of cooking is what distinguishes one chef from another. Given that the ingredients remain the same, isn't it impractical to painstakingly prepare them from scratch each time we crave Biryani? It certainly is.

In contrast to the culinary world, in software engineering, we often find ourselves writing and configuring all components from scratch each time we embark on building a software solution.

Let's consider a hypothetical scenario in software engineering: creating a full-stack application. It entails the development of numerous microservices, handling discovery, gateway, and inter-service communication. Additionally, we must set up logging, observability, security, and privacy mechanisms. Now, ponder this: countless others have undertaken these exact same tasks tens of thousands of times. Isn't it time to rethink our approach and prepare and assemble common technical components in advance, much like having essential spices ready when cooking Biryani.

Starting from scratch each time leads to complications, extended development timelines, and monotony. As a software project expands and requires more boilerplate code, a developer's workload becomes increasingly burdensome. We must simultaneously ensure a solid foundation for our application's architecture. So, the question arises: where do we seek a solution? The answer lies in a scaffolding platform, where we build common components once and assemble them as needed.

Scaffolding represents a modern approach to generating the common building blocks of an application and configuring them to meet the software requirements. An effective scaffold might encompass features such as login and registration pages, service and server connections, routing, discovery, model templates, controllers, security, privacy, and observability mechanisms.

The next time you embark on application development, consider WeDAA, a platform designed for rapid prototyping and scaffolding of technologies and applications.

What You'll Achieve:

Expedited proposal development. Unified systems for design, configurations, and asset control. Enhanced security and privacy standards right from the start. More time to focus on your unique business case rather than common tasks."